The Making of "Solitude" Part 1
Imagine yourself alone, by a lakeshore, at the foot of a fell, with the gentle breeze blowing down the lake. The only sounds you hear are the gentle lapping of waves on the shore, the humming of bees busily gathering nectar and birdsong. Just you and you alone, with nature for company. This is exactly what I had in mind when I created a three colour reduction lino print, called "Solitude".
Reduction linoprinting can be a tricky business. It's not called "suicide printing" for nothing. You carve the lino plate, print a colour, then you carve some more and print the next colour and so on. One false move with a carving tool and it's all over before it's finished, so you really do have to think carefully before each stage of the process.
The first thing you should do before getting into the fun stuff, is to make a registration board. This is something that, if it's made right, will ensure that each successive print will be registered correctly, with little or no overlapping. Here's the registration board I made for this project.
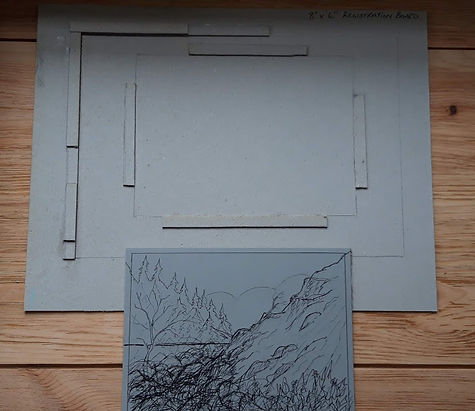
I used good, strong cardboard for this. The backs from sketch pads are a good source. Take your lino plate, in this case an 8" x 6" plate and carefully draw round it, keeping your pencil tight to the lino. I then cut some strips of the same card, about 1cm wide and PVA'd them tight to the lines, checking each time with the lino plate that the fit is indeed tight. You don't want any movement with the lino plate on the registration board otherwise you won't get good registration when you're printing each colour.
I decided to use Fabriano Unica paper for this project, from a pad. The pages are larger than the print, so I simply drew around the pad and cut more 1cm strips, only this time, I made them two high, so there would be no danger of the paper slipping as I'm positioning it for printing.
Once fully dry and you're happy with it, you can begin with the fun stuff! As you can see in the image above, I sketched out on the lino my composition ready for carving.

The first carving is designed to leave white spaces on the paper, so you just remove lino from the places that will be white in the final image. I decided to ink the whole plate in the first colour (in this case a pale blue) because there will be elements of this colour throughout the composition.

Here's the result of the first printing. The texture of the paper, along with the amount of ink you apply to the plate and the amount of pressure applied in the transfer of ink from plate to paper will create variations between prints. This is not a bad thing, because it makes each print unique.
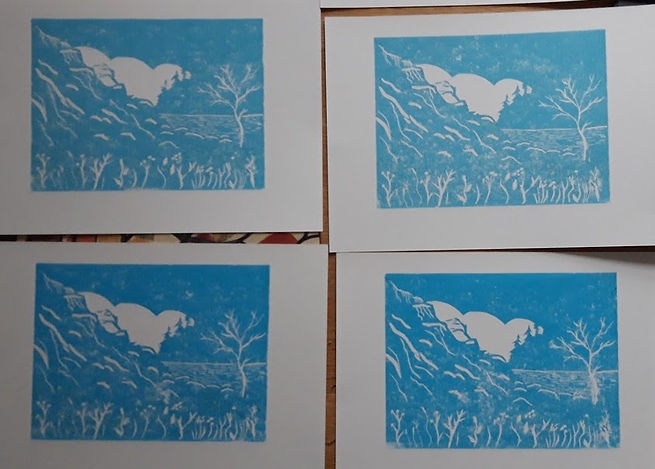
So now I have 16 prints underway. If I can finish with at least 12 good prints after the next two colours I will be satisfied with that, but really I want to get 100% and have 16 good prints! The preparation at the start with the registration board is all important when it comes to achieving this!
Marty Strutt January 2019